In my previous blog post, I wrote about running a VSTS build agent on a docker container. So, it was only logical to try it out on a Windows Container. I had a few pitfalls in my quest to do that and found an issue on my way, however. it all worked in the end.
Note:
Once installed, verify that docker is running fine your machine by type in the following
You should see a message of the like "Welcome to .Net Core!" on your console window. This means that your docker instance is working fine.
4. Pulling microsoft/windowservercore image
So, this is where I got stuck a bit. I was trying to use microsoft/nanoserver, which is a fraction of a size of full windows image and support .Net Core. In the end, I found out that running vso agent on server on nano server is not supported yet.
So, I pulled the full server core image. You can do it by running
The image is about 8GB and takes some time to download. Once pull, run the image by typing in
At this stage, we are on a windows docker container running Windows 10. I checked in by typing [System.Environment]::OSVersion.Version and got the following version
Major Minor Build Revision
----- ----- ----- --------
10 0 14393 0
5. Running VSTS Agent
Now that we have a running container, the steps to run VSO Agent is as simple as running it on any Windows 10 machine.
The only complication is the lack of GUI, so I used powershell to download zip file and extract it as follows
You will see the usual vsts agent's files in the destination directory. Simply type in .\config.cmd and follow instructions.
Note:
At the time of writing this blog, running vsts agent is not supported on Windows Nano server. I could only manage to run it on microsoft\windowsservercore image.
Window Server 2016 and Windows Containers
Windows Server 2016 comes with a full container support powered by built-in operating system features. There is a great session on the internals of windows container on channel9. There are two mechanisms of setting up containers on Windows - Hyper-V Containers which are effectively light weight virtual machines and Windows Containers. I am going to use Windows Containers
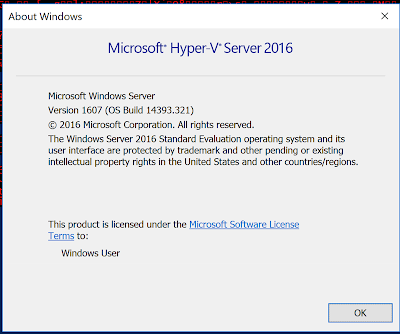
1. Windows 2016 Virtual Machine
To host my containers, I got a Windows 2016 virtual machine going. At the time of writing this blog, Windows Server 2016 is still at Technical Preview 2 stage and new updates are coming frequently. They can be downloaded from the Microsoft website.
The minimum build you will require is Windows
2016 Server build 14393.
Once you have installed windows and are on the virtual machine, open command prompt and type in winver. You will see a dialog like this. Make sure the build number is at least the required version

2. Install Containers Feature
Type in the following command in a PowerShell console window
Install-WindowsFeatures Containers
The feature needs a restart so type in the following
Restart-Computer -ForceOnce the machine is restarted, continue with following
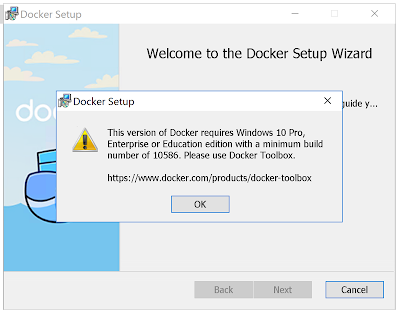
3. Install Docker
The docker version deployed from the msi isn't supported on Windows Server 2016 yet. For me downloading the docker msi from the docker website didn't work and I got the following error

However, got it working by downloading the following zip file
https://download.docker.com/components/engine/windows-server/cs-1.12/docker.zip
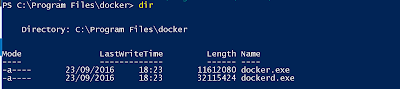
and extracting it to Program Files. I did it by running the following in my PowerShell console
Invoke-WebRequest "https://download.docker.com/components/engine/windows-server/cs-1.12/docker.zip" -OutFile "$env:TEMP\docker.zip" -UseBasicParsingYou will have two executable files in the extracted directory as shown

Add the directory to your path variable.
Now register the dockerd service by typing the following
dockerd.exe --register-service
Alternate Installation Option
After installing docker, I found that the following was a better and easier way of install docker on Windows Server 2016. Type in the following in your powershell console.
Install-Module -Name DockerMsftProvider -Repository PSGallery -Force
Install-Package -Name docker -ProviderName DockerMsftProvider
Restart-Computer -Force
Once installed, verify that docker is running fine your machine by type in the following
docker run microsoft/sample-dotnet
You should see a message of the like "Welcome to .Net Core!" on your console window. This means that your docker instance is working fine.
4. Pulling microsoft/windowservercore image
So, this is where I got stuck a bit. I was trying to use microsoft/nanoserver, which is a fraction of a size of full windows image and support .Net Core. In the end, I found out that running vso agent on server on nano server is not supported yet.
So, I pulled the full server core image. You can do it by running
docker pull microsoft/windowsservercore
The image is about 8GB and takes some time to download. Once pull, run the image by typing in
docker run microsoft/windowsservercore
At this stage, we are on a windows docker container running Windows 10. I checked in by typing [System.Environment]::OSVersion.Version and got the following version
Major Minor Build Revision
----- ----- ----- --------
10 0 14393 0
5. Running VSTS Agent
Now that we have a running container, the steps to run VSO Agent is as simple as running it on any Windows 10 machine.
The only complication is the lack of GUI, so I used powershell to download zip file and extract it as follows
Invoke-WebRequest https://github.com/Microsoft/vsts-agent/releases/download/v2.108.0/vsts-agent-win7-x64-2.108.0.zip -outfile vsts-agent-win7-x64-2.108.0.zip
Expand-Archive -Path .\vsts-agent-win7-x64-2.108.0.zip -DestinationPath C:\vsts-agent
You will see the usual vsts agent's files in the destination directory. Simply type in .\config.cmd and follow instructions.


