Thursday 28 May 2009

Renaming your SQL Server

If you are pondering changing the name of your development machine, you must remember to change the name of your SQL Server as well. I didn't know that and spent a good half an hour trying to run a simple query in the format


Select <ColumnNames> from [ServerName].[DatabaseName].dbo.[TableName]


The server came back with the following error

Could not find server 'GGTFS2-0BUILD2' in sysservers. Execute sp_addlinkedserver to add the server to sysservers.


Struck by the need to create a linked server for itself, I executed the following to find out what servers are present


Select * from sys.sysservers


Only to find that the table still contains the previous name of my machine. The resolution is pretty straight forward. Execute the following

sp_dropserver '<OLD SERVER NAME>'

go


sp_addserver '<NEW SERVER NAME>', 'local'

go


Restart your SQL Server and bang it starts working again :)

Wednesday 27 May 2009

TFS 2010 - First Encounter

I have been reading about TFS 2010 for some time now and frankly am quite eagerly waiting for it. It's a major release which promises some brilliant new features and some substantial redesign. I won’t go into details yet but Brian Harry has done a few posts about the new features in TFS 2010 Beta 1 . TFS2010 and VSTS 2010 was released last week and I had been really waiting to check them out Finally found some time to install it today. One of the areas where Microsoft has promised to bring improvements in TFS is its installation. Installation of existing versions of TFS is not simple to say the least. I remember I struggled for a couple of days while with my first installation of TFS 2005. No doubt, "TFS Best Practices Analyzer" have made troubleshooting in installation much easier installing TFS is still a complicated task.

In my opinion there are four things, which made installing TFS such a complicated task:

1) Creation of users on Active Directory. The person installing TFS needs to create a number of account TFSSETUP, TFSSERVICE and TFSREPORTS and needs to know exactly what rights need to be given to this user in each tier.

2) Dependency of TFS on Windows SharePoint Services and SQL Server Reporting Services. These should be installed and configured before TFS could be set up.

3) TFS wizard does not separate installation of components and their configuration. If there is some problem in configuring any part of installation, the whole installation has to start from scratch.

4) TFS installation wizard does not “screen” the environment for installation, something that “TFS Best Practices Analyzer” does.

I think the point (2) is also very important in that if somebody wants to NOT use detailed reports from Reporting services or the team portal but just use TFS as a source repository (like Visual Source Safe) or source and bug repository, there wasn't another way for them unless they install everything.

Microsoft has addressed at least two of these issues in TFS 2010. The new version allows TFS to be installed completely and then there are wizards for configuring each area of TFS. Also, Microsoft SQL Server Reporting Services and SharePoint are now optional for TFS 2010.

Having read about it and to see how easy it is to install the Team Foundation Server, I thought to do a bare minimum single-server deployment of TFS2010. Following are the steps that I followed to deploy TFS2010

1) Created a new virtual machine taking an image of Windows 2008 service pack 1 as baseline.

2) Installed SQL Server 2008 on the my virtual machine.
  1. From the first step in SQL Server 2008 installation, I selected "New SQL Server stand-alone installation or add features to an existing installation".
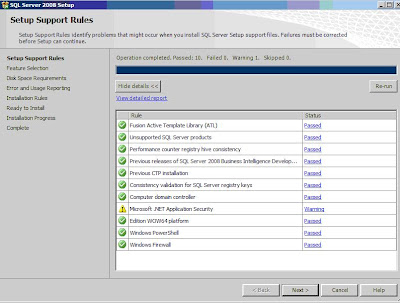
  2. Setup Support Rules ran and gave the following warning. I ignored it.

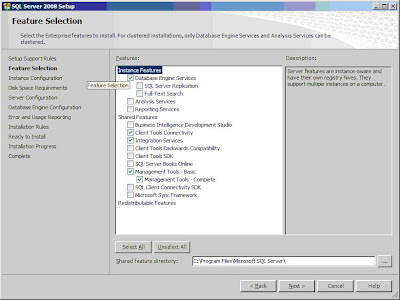
  3. Select following features for SQL Server 2008 installation
  4. Select default Instance
  5. Use NT_AUTHORITY\SYSTEM for all services
  6. Use Windows Authentication mode
  7. Use Administrator account for Database Engine configuration Account Provisioning and Analysis services configuration account provisioning.
  8. In the Reporting Services Configuration, select "Install the Native Mode default configuration"

The next step is to install Team Foundation Server 2010 Beta1 on my machine. Note that I have not installed Windows SharePoint Services or Reporting services yet. I haven't even added any role to my server. I wanted to find out how would TFS installation wizard behave with bare minimum


3) So our third and last major step is to install TFS 2010 beta 1 on the server. I double clicked on the TFS setup file and is shown TFS installation wizard. In a couple of minutes with a couple of clicks, TFS is installed successfully and I am presented with the following configuration wizard.

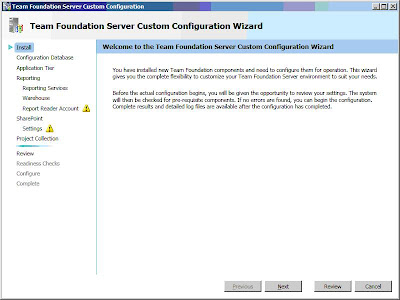
Knowing that the "Default Configuration" uses SharePoint and Reporting services, I decided to use Custom Custom configuration. So, I clicked on "Custom Configuration" and clicked "Start Wizard. The first step of Custom Configuration Wizard is shown

Clicked Next.

The second step "Configuration Database" asks for the name of SQL server instance and also if to use a pre-existing database.


The wizard also allows to specify a label which would be included in the name of database. So if I give a label of "MYTFS" the Tfs_Configuration database would be changed to Tfs_MYTFS_Configuration

Click Next.

The next step is "Application Tier" asking about the account for TFS service and the website for TFS (whether to create a new one or to use an existing one).


Leaving the defaults, I clicked Next

The next step goes on to configure "Reporting Services". It does tell that using reporting service is optional.

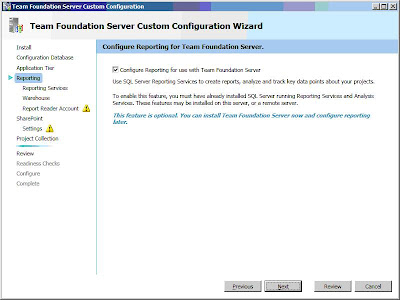
As I don't want to use Tfs Reporting so I simply unchecked the option and clicked next.

The next option is configure SharePoint.

Again, it is an optional feature and I don't want to use it so I simple simply unchecked the option and clicked Next.

The next and last step asked whether I need to create a new Project Collection.


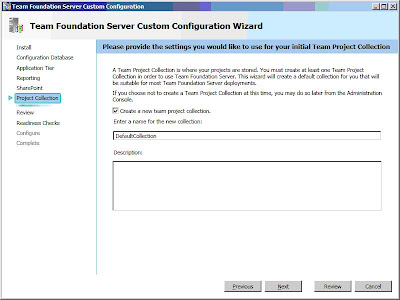
I did not want to create a new Project Collection, apart from the one created by default so just left the default options and click next.

The review screen is shown with a verify button (Something very similar to Best Practices Analyzer :))


I clicked verify to see how is my installation looking and Ouch it came up with the following errors:

Error [ Configuration Database ] TF255149: The following server that is running SQL Server does not have the full-text search feature installed: TestTFS2010. This feature is required for Team Foundation Server to operate correctly. Error [ Configuration Database ] TF255152: Service is not running: SQL Server Database Agent Error [ Application Tier ] TF255120: Compatibility mode for Internet Information Services (IIS) 6.0 is not enabled. Team Foundation Server requires this mode on servers that are running Windows Server 2008. Error [ Application Tier ] TFxxxxxx: The Windows Authentication role service has not been installed in the Web Server (IIS) role. This role service is required for Team Foundation Server to function properly. Error [ Application Tier ] TF255151: Service is not installed: IIS Error [ Application Tier ] TF255151: Service is not installed: IIS Admin Service Warning [ System Checks ] TF255142: Windows Firewall is not enabled. Warning [ Configuration Database ] TF255153: Service is not set to start automatically: SQL Server Database Agent

Not ideal but at least I know what I need to do. So, I
  1. Started SQL Server Agent Service.
  2. Changed Start Mode of SQL Server Agent service from Manual to Automatic.
  3. Added Full-Text search feature to the existing installation of SQL Server 2008.
  4. From Administrative tools, select "Server Manager". Then from the "Roles", click "Add Role". Added following Roles to the server
  • Web Server (IIS) : Adding web server showed the following dialog that I cannot add Web server unless Windows Process Activation Service is installed

    • Clicked Add Required Features and the dialog closes.
    • I installed the following services to the web server role
      1. Common HTTP Features
      2. HTTP Logging
      3. Requrest Monitor
      4. Windows Authentication
      5. Request Filtering
      6. Static Content Compression
      7. IIS Management scripts and tools
      8. IIS6 Management Compatibility
    • Clicked Next and it starts installing the Web Server role


Now that I have installed all the pre-requisites I tried to verify again. There's a "Click to Retry" link in the bottom, which retries all the tests. Clicked it and after about 5 minutes it showed me the following success message.


We are very close now and the whole thing is so much better than what we had in the older versions. Click Next and TFs setup is complete.

Now that TFS is all installed and configured, the next thing I wanted to do was to set up a Team Build. Team build can be on separate machines than TFS but I wanted to test it all in a single machine environment.

To configure team build, I clicked Team Build configuration from the Team Foundation Server configuration wizard and the clicked Start Wizard


The first page of Team Foundation Build service is shown.


I clicked Configure and was presented with the following dialog


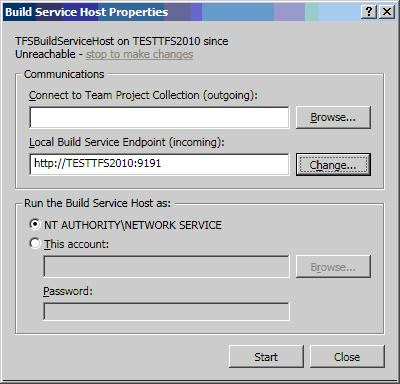
Since, there is no TFS server listed, I clicked on the Browse button and then clicked add.


In the dialog, type in the name of my TFS server and then clicked OK.
In the connect to Team Project Collection, click Connect and then click start from the Build Service Host Properties and here you go. The Build Service Host has been configured.


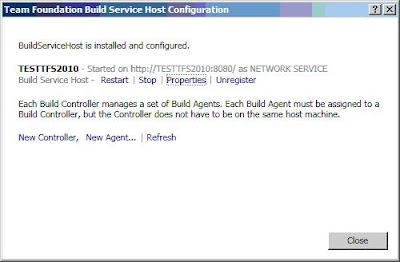
Click New Controller and it will create a new Controller service for you. The next and final step is to create a new Build Agent. Clik on New Agent. The following dialog is shown


Type in a name for your agent, leave controller as default and change the status to Enabled and then click OK. And here you go, our build agent is now available for your build server.


Now, we have successfully completed a a single server installation of TFS and created a build server. If you have worked with previous version, you would appreciate how easy it is as compared to it's predecessors.

In my next post, I will create a new team project and explore new features in the new version of TFS.

Wednesday 20 May 2009

Microsoft C# 4.0

Today, I had a chance to look at this excellent presentation from Anders Hejlsberg on Microsoft C# 4.0 and it's future direction. Found it really enlightening. What I also find fascinating is that C# is evolving into more and more dynamic language, where type correction is making way for flexibility and powerful expression. We saw some of that with the introduction of var keyword in C# 3.0 and now we have a new keyword "dynamic" for Dynamic Language Runtime. I can almost hear a Visual Basic vs C++ argument echoing into my ears :) Language purists might loathe it  but we can't deny the advantages of dynamic languages in creating quick simple applications. (Imagine the life if javascript was strongly typed). The danger is ofcourse that people would get carried away with it and we would see quite a lot of badly written dynamic code causing lots and lots of runtime type conversions.

Another notable thing is the use of more and more functional programming features in C#. This is definitely a good thing. Especially now that all modern languages run over a virtual machine, where they have a real chance to get some performance optimisation by doing some clever prediction on the behaviour of executing code.

PS: Beta 1 of VSTS2010 and .Net 4.0 was released today for MSDN subscribers. Here's the link

Sunday 17 May 2009

Wolfram Alpha

After all the hype, Wolfram Aplha was launched this weekend and has already attracted tremendous media coverage. It's been touted as the future face of internet. Unlike traditional search engines, it claims to be an "answer engine" rather than a search engine. You type in the question and it come up with an answer ... nice.. isn't it. Sounds like the "Computer" in science fiction movies.

Unlike google, it's not a search engine. It's a "knowledge engine" containing trillions of data elements stored in a manner that computation is possible on them. Mathemetica, also developed by Steven Wolframe is at the heart of the engine. I did some queries on the engine like "What is the population of the world" and "center of the earth" and it came up with the numbers - very impressive

Then I remember that is a "I'm feeling lucky" button on google, which also make an "intelligent guess" on your answer. I typed in the same questions "What is the population of the world" and "center of the earth" and google took to wikipedia page about the population of world - not exactly what I asked for. Wolfram Alpha scored over google.

But then I asked a non-factual question "Who is Roger federer's wife" and wolfram alpha was stumped. Asked the same on google and it promptly came up with the page of his wife's details.
I tried another question "best place to eat in London" and wolfram alpha didn't return an answer. Asked the same to google and pressed the "I'm feeling lucky" button it came up with a list of restaurants - not exactly and answer but let me choose from a list of good restaurants. This is exactly what I wanted.

The matter of fact is that it is almost impossible to find answers of absolute everything. A lot of things have answers, which depend upon the context in which the question is asked. The question "Best restaurant in London" would have a different answer depending upon the person's own likes or dislikes. So until an engine like Wolfram Alpha has a historical perspective of every visiting person (which itself is a scary thought), it is very difficult to complete what the ultimate vision of the project is.

Also, the hype that Wolfram Alpha will replace google is not true as said by the creater himself.

Friday 15 May 2009

Reconfiguring Build agents after moving TFS machine - Revisited

In my last post, I wrote about how to re-configure your build agents after you have moved your TFS server from one machine to another. Well, it worked for most of our build agents but for one. The server didn't have any entry for the the registry key


HKCU\Software\Microsoft\VisualStudio\9.0\TeamFoundation\Build\Service\AllowedTeamServer

and in <add key="AllowedTeamServer" value="" /> setting in the tfsbuildservice.exe.config file. I tried to change the value in the config file to the new server and from everywhere I could find in registry but nothing worked.

I found that TFS also maintain settings in the registry entry

HKEY_USERS\S-1-5-21-3665379455-301544577-1723053213-1110\Software\Microsoft\VisualStudio\9.0\TeamFoundation\

where, S-1-5-21-3665379455-301544577-1723053213-1110 is the ID of the user under whose context the Team Foundation Server Build service is running.

I added keys for Build\Service and a string value for setting "AllowedTeamServer" - giving the name of the new TFS server in the setting value. Restarted the server and the build agent started working.

Wednesday 13 May 2009

Reconfiguring Build agents after moving TFS machine.

In my previous post, I wrote about moving Team Foundation server from one machine to another (I moved it from a physical machine to a virtual machine). The move went very smooth and is well documented.

However, making the build agents to work with new TFS was a different story. As part of sanity test after the move, I checked out a few files, checked them back in, browsed through the history, added and updated some work items and everything went hunky dory. But when I tried to run the build, I got the following error:

TF215085: An error occured while connecting to agent \TeamProjectName\AgentName: The build (vstfs:////Build/Build/14918) has already completed and cannot be started again.

Searching the error number on the internet mostly suggested that the user for the build service does not have access rights to access TFS server. It proved to be red herring.

After confirming that the user had all the rights it needed on the build server, the second thing was to verify whether the TFS machine can reach the build server. There is a setting in the tfsbuildservice.exe.config, which tells what servers are allowed to access this build server.


It is empty by default and so was the case with me. The build service keeps the name of the TFS Server at registry entry

HKCU\Software\Microsoft\VisualStudio\9.0\TeamFoundation\Build\Service\AllowedTeamServer

I looked in there and could see that it had the name of my previous TFS service. I changed that. Search the whole registry and replaced all entries of previous TFS server with the new one. Restarted the buld server but it still didn't work.

Then, I put the value of new TFS server in the config file and restarted the service and Wholla it built correctly. Once the build happened, I configured the config file back to it's default state, restarted the service and it still builds correctly.

Monday 11 May 2009

MSBuild Extensions

Today, I noticed that my first ever contribution to an open source project has been published. I had been working closely with Mike Fourie, who has been heavily involved with the MSBuild Extension pack. It's a library with a number of tasks that you can use in your MSBuild project, so that you don't have to re-invent the wheel. The tasks include commonly used functionality like managing folders, giving access rights to users, managing COM Plus applications, etc.

I use this library a lot in our project. I recently wrote some new functionality to concatenate strings in an MSBUIlD string. This got published in early April and Mike has kindly mentioned my name there :) http://msbuildextensionpack.codeplex.com/SourceControl/ListDownloadableCommits.aspx?ViewAll=true

More, I have also written functionality to create shortcut of installed files, so users can create links in desktop, start menu etc. It's not published as well.

Thursday 7 May 2009

Moving Team Foundation Server from Physical to a virtual machine

We have been using a single-machine installation of TFS for quite a few years now. The single-machine installation with Application & Data tiers on a single server serves us well. We recently moved from TFS 2005 to TFS 2008 but remained on SQL Server 2005. A recent review of the project identified potential benefits of moving TFS to a virtual machine. Microsoft’s stance on this is that the application tier of TFS is supported in Hyper V but SQL Server 2005 is not. However, browsing through various posts and example scenarios we decided to go for it.


Microsoft has provided a complete guide of moving from one hardware configuration to another, which is fairly comprehensive. Here I will write only from the perspective of moving a single server.


Note that in our scenario, we are also moving the domain of our TFS server. Some of these steps are not needed if your new TFS server uses the same server. Also, I assume that you have already had TFS installed in your new server. To install the TFS server you can download TFS installation guide from here If you have MSDN subscription, you can avoid the pain of installing everything by simply downloading TFS VM

Existing TFS Machine:

  1. Take a backup of Encryption key from your Reporting Server.
    a. For this, open Start menu >> Microsoft SQL Server 2005 >> Configuration Tools >> Reporting Service Configuration.
    b. Ensure that the Machine & Instance Names are correct and click Connect.
    c. Click Encryption Keys from left menu and click on the Backup button.
    d. Save the key file to a location from where you can read it in the new server.

  2. Take a backup of existing TFS databases and copy them out. I use LiteSpeed from Quest Software to take backups but simple SQL scripts or a manual backup of all databases would do the same. The databases that you need to take backup of are


  • ReportServer

  • ReportServerTempDB

  • TfsBuild

  • TfsIntegration

  • TfsVersionControl

  • TfsWarehouse

  • TfsWorkItemTracking

  • TfsWorkItemTrackingAttachments

Make sure that you copy the backup files & encryption keys to a place from where they can be read by the new server.


New TFS Machine:


Preparation:


1. Copy the backed up databases to local drive.


2. From a Command Prompt window, run


  • net stop TFSServerScheduler

  • net stop SPTimer

3. In Internet Information Services (IIS) Manager, stop the following app pools


  • ReportServer

  • TFS AppPool

4. Stop the Reporting Service instance. To do this


  • For this, open Start menu >> Microsoft SQL Server 2005 >> Configuration Tools >> Reporting Service Configuration.

  • Ensure that the Machine & Instance Names are correct and click Connect.

  • Click Server Status from left menu and click on the stop button.

Database Restoration:
Connect to SQL server using SQL Server Management Studio and restore the following database in the same order:


• ReportServer
• ReportServerTempDB
• TfsBuild
• TfsIntegration
• TfsVersionControl
• TfsWarehouse
• TfsWorkItemTracking
• TfsWorkItemTrackingAttachments


Setting Database users:
Since the database restored are from a different machine, with a different domain, the database users need to be set up again.

1. Click Start, click All Programs, Microsoft SQL Server 2005, and then click SQL Server Management Studio.

2. In the Connect to server dialog, click OK.

3. Expand Databases.

4. Expand the database “TfsActivityLogging”. Expand Security and then expand Schema. Name the new Schema as \. Expand Users. Click New User. Then in the login name browse to the user \. Set the user name as \. In the Roles section, select role “TFSExecRole”. In the Owned Schema section, select schema “Domain \”. Delete the user and schema \.

5. Expand the TfsBuild database. Expand Security and then expand Schema. Name the new Schema as \. Now expand Users. Click New User. Then in the login name browse to the user \. Set the user name as \. In the Roles section, select role “TFSExecRole”. In the Owned Schema section, select schema “\”. Delete the user and schema \.

6. Expand the TfsIntegration database. Expand Security and then expand Schema. Name the new Schema as \. Now expand Users. Click New User. Then in the login name browse to the user \. Set the user name as \. In the Roles section, select role “TFSExecRole”. In the Owned Schema section, select schema “\”. Delete the user and schema \.

7. Expand the TfsVersionControl database. Expand Security and then expand Schema. Name the new Schema as \. Now expand Users. Click New User. Then in the login name browse to the user \. Set the user name as \. In the Roles section, select role “TFSExecRole”. In the Owned Schema section. Select schema “\”. Delete the user and schema \.

8. Expand the TfsWarehouse database. Expand Security and then expand Schema. Name the new Schema as \. Create another schema called \TFSReports. Now expand Users. Click New User. Then in the login name browse to the user \. Set the user name as \. In the Roles section, select role “TFSExecRole”. In the Owned Schema section. Select schema “\”. Click New User. Then in the login name browse to the user \TFSReports. Set the user name as \TFSReports. In the Roles section, select role “TFSWarehouseDataReader”. In the Owned Schema section. Select schema “\TFSReports”. Delete users and Schemas \ and \.

9. Expand the TfsWorkItemTracking database. Expand Security and then expand Schema. Name the new Schema as \. Now expand Users. Click New User. Then in the login name browse to the user \. Set the user name as \. In the Roles section, select roles “db_datareader”, “db_datawriter” and “TFSExecRole”. In the Owned Schema section. Select schema “\”. Delete the user and schema \.

10. Expand the TfsWorkItemTrackingAttachments database, Expand Security and then expand Schema. Name the new Schema as \. Now expand Users. Click New User. Then in the login name browse to the user \. Set the user name as \. In the Roles section, select roles “db_owner” and “TFSExecRole”. In the Owned Schema section. Select schema “\”. Delete the user and schema \.


Change Server Name in Tables
Now, since the databases we have restored contains details of the old database. We need to change the name of servers from within the database. I did it by manually changing the serverName in database tables
1. Open table tbl_database in database “TfsIntegration”. Replace the value of column “servername” with the name of new TFS server.


Reconfigure Application Tier
1. From a Command Prompt window, run


C:\Program Files\Microsoft Visual Studio 2008 Team Foundation
Server\Tools\TfsAdminUtil ActivateAT


Reconfigure Report Server
To restore and verify Report Server on the new Team Foundation Server

1. Click Start, click Administrative Tools, and then click Internet Information Services (IIS) Manager.

2. In the Explorer pane, under the Application Pools node, right-click Report Server, and then click Start.

3. Click Start, click Programs, click Microsoft SQL Server 2005, click Configuration Tools, and then click Reporting Services Configuration.

4. In Report Server Installation Instance Selection, make sure that the computer name is the name of the new Team Foundation application-tier server and that the instance name is MSSQLSERVER, and then click Connect.


5. In the Explorer pane, click Server Status.

6. In the Report Server Status pane, in Instance Properties, click Start.

7. In the Explorer pane, click Database Setup.

8. In the Database Connection pane, make sure that the name of the Team Foundation data-tier server is correct in Server Name, and then click Connect.

9. On the SQL Server Connection Dialog dialog box, click OK.

10. In the Database Connection pane, click Apply.

11. On the SQL Server Connection Dialog dialog box, click OK.

12. Restore the encryption key and remove previous instances of Report Server by doing one of the following:

If you are running SQL Report Server Enterprise Edition


1. In the Explorer pane of Reporting Services Configuration, click Encryption Keys.


2. In the Explorer pane, click Encryptions Keys.


3. On the Encryption Key page, click Restore.


4. On the Encryption Key Information page, type the password for the encryption key file in Password, type or select the backup encryption key .snk file location in Key File, and then
click OK.


5. In the Explorer pane of Reporting Services Configuration, click Initialization.


6. On the Initialization page, select the instance ID that corresponds with the name of the old Team Foundation data-tier server, click Remove, and then click OK.


Note: Do not remove the installation ID that you recorded in the "To save Reporting Service installation IDs and stop services" section of this document.

13. Open Internet Explorer and connect to http://localhost/reports [ http://localhost/reports ] . In Contents, click TfsReportDS.

14. In Connection string, type “Data source=TFSMachineName;initial catalog=TfsWarehouse”. Select option Credentials stored securely in the report. Update the user name and password to reflect the new reporting services service account. Check the checkbox “Use as Windows credentials when connecting to the data source” and then click Apply.

15. Under SQL Server Reporting Services, click Home.

16. In Contents, click TfsOlapReportsDS.


17. In Connection string, type “Data source=TFSMachineName;initial catalog=TfsWarehouse”. Select option Credentials stored securely in the report. Update the user name and password to reflect the new reporting services service account. Check the checkbox “Use as Windows credentials when connecting to the data source” and then click Apply.

18. Click Start, click Administrative Tools, and then click Internet Information Services (IIS) Manager.

19. In the Explorer pane, under the Application Pools node, right-click Team Foundation Server, and then click Start.

20. Open a Command Prompt window and change directories to drive:\%ProgramFiles%\ Microsoft Visual Studio 2008 Team Foundation Server\Tools. Type the following command, where newDataTierServerName is the name of your new Team Foundation data-tier server, TFSReportServiceAccount is the name of the reporting services service account, and TFSServiceAccount is the name of the Team Foundation Server service account:
SetupWarehouse.exe -o -s newDataTierServerName -d Tfswarehouse -c warehouseschema.xml -ra TFSReportServiceAccount -a TFSServiceAccount –mturl http://TFSServerName:8080

21. On the Team Foundation data-tier server, click Start, click Programs, click Microsoft SQL Server 2005, and then click SQL Server Management Studio.

22. On the Connect to Server dialog box, in Server type, select Database Engine, verify that the server name and authentication values are correct, and then click Connect.

23. In the Object Explorer pane, expand Databases, expand TFSWarehouse, expand tables, right-click dbo._WarehouseConfig, and then click Properties.

24. In Table Properties - _WarehouseConfig, in Select a page, click Permissions.

25. In Users or Roles, click Add.

26. In Select Users or Roles, add the Reporting Services service account (referred to generically as TFSReports), and then click OK.

27. In Table Properties - _WarehouseConfig, click OK.

28. In the Object Explorer pane, click Connect, and select Analysis Services.

29. On the Connect to Server dialog box, make sure that the server name and authentication values are correct, and then click Connect.

30. In the Object Explorer pane, expand Databases, right-click TFSWarehouse, and then click Process.

31. In Process Database - TFSWarehouse, click OK.


Reset Domain Accounts and SID
Please note that these steps are only needed if the domain of the new server is different to the original server

1. From a Command Prompt window


  • Execute C:\Program Files\Microsoft Visual Studio 2008 Team Foundation Server\Tools\TfsAdminUtil Sid.

  • Create users in the domain for all accounts that are listed as a result of last command.

  • Execute C:\Program Files\Microsoft Visual Studio 2008 Team Foundation Server\Tools\TfsAdminUtil Sid /Change

2. Add user \TFSReports to the “administrators” group of the new TFS server.


Restart Services and verification

1. On the Team Foundation application-tier server, change directories to http://localhost/reports.

2. In Contents, click any project, click any one of the default reports in the project, and then verify that it appears correctly.

3. On the new Team Foundation application-tier server, click Start, click Administrative Tools, and then click Internet Information Services (IIS) Manager.

4. In the Explorer pane, expand the Application Pools node, right-click TFS App Pool, and then click Start.

5. On the new Team Foundation application-tier server, click Start, click Administrative Tools, click Services, select the TFSServerScheduler service, and then click Start, if it is not started already. Select the SharePoint Timer Service, and then click Start.

6. On the Team Foundation data-tier server, connect to http://localhost:8080/WorkItemTracking/v1.0/ClientService.asmx.

7. In ClientService, click StampWorkitemCache.

8. In StampWorkitemCache, click Invoke.

Note: The StampWorkitemCache invocation will not return any data.


I hope this post will help you move single-server TFS installation around quickly and easily. If you find any error in any of these steps, please do leave a comment.